
Posted by Cas on Nov 6th 2026
Car Audio Upgrade: What to Change First and How to Plan It
Car Audio Upgrade: What to Change First and How to Plan It

The best car audio upgrade is the one planned around your vehicle, your listening goals and your budget, in that order. Start with the signal source and speakers if clarity is the complaint. Add an amplifier and subwoofer when you want power and bass. Fund the wiring and electrical side at every stage, because that is what keeps a bigger system clean and safe. This guide walks through the order, the matching rules, the costs and the checks that prevent distortion.
TL;DR
- Plan from the vehicle outward: available space, electrical capacity, your goals, then your budget. Pick parts last.
- A sound order for most builds: source, speakers, amplification, subwoofer, with wiring and electrical work planned from day one.
- Match amplifier RMS power to speaker RMS ratings. Peak wattage on the box is not the number to shop by.
- Muddy or harsh sound is usually a tuning, wiring or grounding problem, and each has a specific check.
- You can build in stages, as long as each stage is safe and matched.
Table of Contents
- Start with the vehicle and your goal
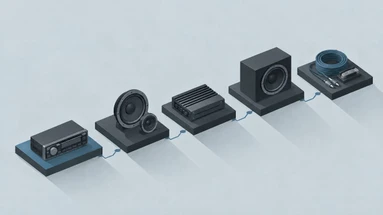
- The upgrade order that works
- How to match an amplifier to your speakers
- Plan the electrical side before you plan the bass
- Why your car stereo sounds bad, and how to find the cause
- Set gain correctly and protect your hearing
- What a car audio upgrade costs
- Install it yourself or use a professional?
- Our perspective
- Get a matched system from Crystal Audio Solutions
- FAQ
- Sources
Start with the vehicle and your goal
Before you compare a single product, write down three things: what the car can physically hold, what the electrical system can supply, and what you want to hear.
The car audio buying guide from NADA frames the process the same way. It begins with your needs and the factors that follow from them: budget, vehicle compatibility (including mounting space and whether wiring changes are needed), sound quality goals, power requirements and installation constraints.
Your goal matters more than most people expect. A daily driver who wants clear vocals at commuting volume needs a very different system from someone building for competition. “Louder” is not a goal. These are:
- Clarity: vocals and detail that stay clean as volume rises.
- Deep bass: low-frequency extension that you feel, without boom or rattle.
- Maximum output: high sound pressure, which puts real demands on the electrical system.
- Balanced everyday listening: a modest upgrade that makes the factory setup sound finished.
Write your goal in one sentence. Every later decision, from amplifier channels to wire gauge, gets easier when you check it against that sentence.
The upgrade order that works
Upgrading in a sensible sequence means each new part gets a clean signal and enough power. The sequence below suits most vehicles.

1. Source: the head unit or factory signal
Everything downstream depends on the signal it receives. If you keep the factory radio, you can still add amplifiers using a line output converter that taps the speaker-level signal. If you replace it, a quality aftermarket unit with a strong preamp output gives an amplifier a cleaner signal to work with. Either way, decide this first, because it determines how you connect everything else.
2. Speakers: where clarity is won or lost
Factory speakers are usually built to a price, and they are often driven by a small amplifier chip inside the radio. Better speakers recover detail in midrange and treble, the part of the music where voices and instruments live. Fit matters: the size and mounting depth in each door or dash position decide what you can install.
For builds that need a dedicated mounting solution, speaker pods give you a way to place drivers where the vehicle does not provide a factory location. Check the available space first, then choose.
3. Amplification: clean power
An amplifier gives speakers the headroom that a radio’s internal chip cannot. Size it to the channel count you need: one channel per speaker, plus a mono channel for a subwoofer, or a combination amplifier that covers both jobs. More clean power at moderate volume is what lowers distortion, so a well-matched amp can improve clarity even when you are not listening loudly.
4. Subwoofer and enclosure: the low end
A subwoofer takes the lowest frequencies off your door speakers, which lets them play cleaner. The enclosure is half of the result. Its volume and type shape how the sub sounds, and a mismatched box can make even a good driver sound boomy or thin. Choose the sub, amplifier and enclosure as a set.
5. Electrical: the part everyone underbudgets
Power wire, fusing, grounds, the battery and the alternator decide whether the amplifier can deliver what you paid for. Treat this as a first-class line in the budget, not an afterthought. Many installers plan 15 to 25 percent of the total for wiring and electrical work, and the most common mistake is spending on the amp and sub first and leaving too little for this layer.
How to match an amplifier to your speakers
The rule that prevents most mismatches is to compare RMS power, which is continuous power, rather than the peak figure printed in large type.
| What you are matching | What to look at | Why it matters |
|---|---|---|
| Amp to speakers | Amp RMS per channel vs speaker RMS rating | Underpowered amps clip, overpowered amps can overdrive a driver |
| Amp to subwoofer | Amp RMS at the sub’s final impedance vs sub RMS rating | Impedance changes the power the amp delivers |
| Amp to wiring | Total current draw vs wire gauge and fuse | Undersized wire starves the amp and creates heat |
| Amp to electrical system | Total draw vs alternator output and battery | A weak supply causes dimming lights and thin bass |
A common guideline is for amplifier output to meet or slightly exceed the speaker’s RMS rating. That gives the speaker clean headroom instead of a clipped signal, which is what actually hurts drivers.
Impedance deserves a second look. A subwoofer with dual voice coils can be wired several ways, and each wiring changes the load the amplifier sees and therefore the power it makes. Confirm the amplifier is stable at the load you plan, and read its rated power at that load.
Plan the electrical side before you plan the bass
A louder system draws more current. The factory charging system was designed for the car’s original equipment, not for a high-output amp stack. As the build grows, you should look at the following:
- Power and ground wiring: correct gauge for the current and the length of the run, fused close to the battery.
- Battery: a healthy battery with good capacity helps hold voltage during bass peaks.
- Alternator: higher-output units support systems that would otherwise pull the voltage down.
- Grounds: short, to bare metal, firmly attached.
Grounds matter more than they look. Sony’s support guidance says to attach every component’s ground firmly to bare metal and keep the wire short, because long grounds can pick up noise you hear through the speakers.
We stock the electrical pieces as well as the audio pieces for exactly this reason: wire, batteries and alternators are part of the system, not accessories to it.
Why your car stereo sounds bad, and how to find the cause
If your goal is clearer sound, diagnose before you buy. The symptom usually points to the cause.
| What you hear | Check first |
|---|---|
| Muffled or harsh sound | Equalizer settings, tweeters, crossover points |
| Weak or boomy bass | Subwoofer phase, crossover setting, bass boost |
| Distortion or crackling | Amplifier gain, connections, speaker condition |
| Hiss or whine | Grounds, signal cable routing |
| Whine that rises and falls with engine speed | Ignition parts, the alternator, or a noise suppressor |
That last row has a specific source. Sony’s guidance notes that alternator-style whine or clicking that follows engine speed may come from the electrical system, such as old spark plugs or wires, ignition components or the alternator, and that if those are fine a noise suppressor may be needed.
Two habits save time on any build. First, check speaker polarity so every speaker moves in the same direction. A reversed speaker cancels bass and smears the stereo image. Second, use the balance and fader controls to isolate which speaker or channel is the problem. For a precise approach, DSP makers describe measuring every speaker at the same output level as the first tuning step, which rules out installation faults such as wiring errors or acoustic cancellation before you adjust anything else.
Set gain correctly and protect your hearing
Gain is not a volume knob. It matches the amplifier’s input to the signal level coming from the source. Set it too high and the amp clips, which is the harsh, flat-topped distortion that sounds bad and stresses speakers.
Amplifier manufacturers publish setup steps. Kicker’s CX Series manual, for example, explains that playing a system loud enough to distort can permanently damage hearing, and that pain is a sign the level is too high. The same manual describes setting input gain by raising it until distortion is audible and then backing it off a little. Keep your settings conservative, and set them with the car parked and the cabin quiet.
The same manual also lists the basic checks to run when something is wrong: RCA connections and routing, the remote turn-on wire, and battery voltage and protection indicators. If an amplifier goes into protection, look at power, ground and speaker wiring before changing anything else.
What a car audio upgrade costs
Costs spread widely because the scope does. ConsumerAffairs reports that new car audio can run from $25 to more than $2,500. Its figures put a quality head unit at roughly $300 to $700, with $100 to $150 more for professional installation, and a pair of speakers at about $25 to $200. A custom setup can take five or more hours of labor and cost thousands of dollars.
Here is how to think about a budget without chasing a total.
- Set the goal first. A clarity upgrade for a daily driver and a competition build are different projects.
- Reserve the electrical share. Put wiring, fusing and any battery or alternator work in the plan on day one.
- Spend on the matched set. An amp, sub and enclosure chosen together outperform a pile of individually impressive parts.
- Decide who installs. Labor can be a large share of a complex build.
Building in stages
If the finished system costs more than you can spend now, build it in phases. A workable sequence is electrical wiring first, then amplifier and subwoofer, then full-range amplification and speakers, then further electrical upgrades. The rule is that every stage must be safe and properly matched on its own. Buying the largest amplifier first and promising to fix the wiring later is how people end up with a system that sounds worse than the one they started with.
Flexible payment options can help you buy the right stage now instead of the wrong cheap one.
Install it yourself or use a professional?
Some jobs are friendly to a first-timer. Swapping a pair of door speakers that use factory mounting points, or fitting a plug-in harness adapter, is a job many owners handle with basic hand tools and patience.

The work gets harder as current and complexity rise. Running power cable from the battery through the firewall, fusing it correctly, building an enclosure that fits your trunk, tuning gain and crossovers, and upgrading an alternator are the points where an experienced installer earns their fee. A mistake in the power run is not just a sound problem. It is a heat and fire risk, which is why fusing near the battery and the right wire gauge are not optional.
A practical way to decide: if the job only touches signal and speaker wires, you can reasonably learn it. If it touches the main power feed, the charging system or body panels, plan on professional help or at least a professional check of your work.
Our perspective
Most of the disappointing systems we hear about were not built from bad parts. They were built from parts that did not belong together: an amplifier that does not suit the speakers, a subwoofer in the wrong enclosure, wiring too small for the current.
That is why we start with your vehicle and your goal rather than a product list. Tell us what you drive and what you want from the system, and we recommend parts that work as a set, then verify compatibility before you buy. Our team includes real installers, so the advice reflects how these systems go together in an actual car.
We would rather you get the electrical foundation right and add to it over time than rush into a bigger amp that the car cannot feed. Whether you are a daily driver who wants better sound or a competition builder chasing output, the process is the same: plan, match, then build.
Colten
Get a matched system from Crystal Audio Solutions
If you are ready to move from planning to buying, Build My System is where we do the matching for you. We look at your vehicle details and your goals, then recommend subwoofers, amplifiers, enclosures, wire and electrical components that fit together. Bundle savings apply automatically, and flexible payment is available.

You can also browse our subwoofers, amplifiers, alternators, batteries, wire, enclosures and speaker pods on the Crystal Audio Solutions store, including our own CAS subwoofers. For advanced builds, we offer custom battery builds and recone services.
FAQ
What should I upgrade first in my car audio system?
Upgrade based on your complaint. For clarity, start with the signal source and speakers. For bass, plan a subwoofer, a matched amplifier and the wiring to support them. If you expect to add components later, put the electrical foundation in first.
Do I need an amplifier if I replace my speakers?
Not always, but most aftermarket speakers perform better with more clean power than a factory radio supplies. An amplifier gives them headroom, which lowers distortion at moderate volume. Match its RMS output to the speakers’ RMS ratings.
How do I make my car audio clearer without making it louder?
Fix the basics first: speaker polarity, equalizer settings, crossover points, gain and grounds. Then consider better speakers and an amplifier sized to them. Clarity comes from clean signal and enough power, not from volume.
How much should I budget for a car audio upgrade?
It depends on the goal. Published figures range from about $25 for simple speaker replacement to more than $2,500 for larger projects, and custom systems can cost thousands with installation. Reserve part of your budget for wiring and electrical work, and consider building in stages.
Can my factory alternator handle a bigger system?
It depends on the total current your amplifiers draw compared with what the charging system and battery can supply. Check the electrical load before you buy, and look at a stronger battery or alternator as the system grows.